Monday, August 31, 2009

cubed, hacked caprese

I tried this Smitten Kitchen twist on caprese, and it's an excellent seasonal recipe that transforms your guilty desire to turn eat nothing but caprese for dinner into a perfectly reasonable choice. I made it with fresh basil rather than the pesto and ate it plain and on sliced french bread. OUTSTANDING!

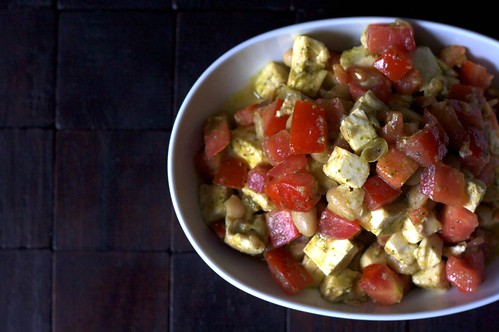
cubed, hacked caprese: "

cubed, hacked caprese


... Read the rest of cubed, hacked caprese on smittenkitchen.com


© smitten kitchen 2006-2009.
permalink to cubed, hacked caprese 151 comments to date see more: Beans, Photo, Salad, Side Dish, Summer, Tomatoes

"

Wednesday, August 19, 2009

Enjoy Homemade Butter in Less Than Five Minutes [DIY]

Enjoy Homemade Butter in Less Than Five Minutes [DIY]: "

Homemade butter is vastly superior to its store-bought equivalent, but nobody wants to pull out or buy a butter churn. This churn-free method makes it worthwhile, producing the kitchen staple (and some bonus buttermilk, too) in under five minutes.

Danny at the Over The Hill And On A Roll blog has the instructions on making butter with just two ingredients:

  • 16 ounces of heavy cream, chilled
  • 1/2 teaspoon salt

Basically, you're just beating the cream until it 'start to look like scrambled eggs' and separates into butter and buttermilk. After that happens, you'll remove the butter from the remainders and squeeze it into a 'ball-o-butter'. Quick, simple, and it'll make your cookies better.

Are there other groceries you make at home? Do you think they're better than the store-bought equivalents? Share your recipes, and their custom-crafted components, in the comments.

How To Make Butter In Under 5 Minutes! [Over The Hill And On A Roll]


"

Monday, August 17, 2009

Family farmers: No NAIS in our name

Family farmers: No NAIS in our name: "

NPPC doesn’t speak for me: Rhonda Perry, a Missouri farmer and director of the Missouri Rural Crisis Center, is tired of Big Meat purporting to represent her interests in Washington. NAIS, a controversial animal tracking program [that we've covered numerous times], is just the newest example of the “farm lobby” abandoning the interests of actual farmers. But for once, family farmers had the opportunity to tell the USDA just how much they disagree with industry overlords: In listening sessions across the country, a vast majority of producers spoke out against the program, which is being pushed by the likes of the National Pork Producers Council and the National Milk Producers Federation.


Says Perry, “Given the shocking chasm between our corporate farm groups and real family farmers, NAIS is only the tip of the iceberg when it comes to bad farm policy that emanates from of Washington. So the next time you hear that ‘farm groups’ oppose cracking down on antibiotics, or that they want to water down environmental regulations over factory farms or that we need another free trade agreement the likes of the one with Colombia, just remember whose interests these folks really represent–and it’s not rural America.” (Minuteman Media)


This isn’t exactly new news, but Perry says it better than many others we’ve seen. Read her op-ed, raise a fist, and hope the USDA and Congress are listening up.


"

Recycle Wine Bottles into Stylish Outdoor Torches [DIY]

Recycle Wine Bottles into Stylish Outdoor Torches [DIY]: "

Think cheap Tiki torches are tacky? Want something a bit sturdier and with more refined looks? Use this simple tutorial to turn recycled wine bottles into swanky bug-repelling outdoor lighting.

Gerardot&Co., a design and marketing agency, put together a tutorial on recycling wine bottles into mounted torches. The design is ingeniously simple, and requires only a few bucks worth of parts from your local hardware store. You'll need a few copper fittings, a bolt, a few nuts, and a mounting plate, along with a standard torch wick and some oil.

Assuming you've got the bottles on hand, or some friends willing to down a few for a good cause, for under $50 you could outfit a sizable yard with wine-torches. Torches, we might add, that have a sizable 750ml reservoir to them burning bright, no matter how late your dinner parties last.


"

Keep Your Plants Pampered with a Wine Bottle Plant Nanny [Outdoors]

Keep Your Plants Pampered with a Wine Bottle Plant Nanny [Outdoors]: "

You can keep your plants well-watered by arranging for Twitter alerts when they're thirsty, but using a wine bottle as a 'plant nanny' to maintain consistent levels of moisture seems more efficient. Plus you can sate your own thirst, too.

The Early Show has a neat way of saving $5-$50 by using empty wine bottles instead of store-bought 'plant nannies.' It's as simple as filling up the wine bottle with water, putting a spike on the end, and sticking the entire contraption upside down into a planter. Water will seep into the dirt gradually and keep your plants sated without drowning them.

It's a great, simple solution for keeping your plants watered without much work on your part (though you could also just choose more low-maintenance plants). Have your own neat use for empty wine bottles? Or do you have a particularly sneaky way of making your plants not even notice that you're gone? Tell us all about your tricks in the comments.


"

Sunday, August 16, 2009

Sunday, August 9, 2009

Wednesday, May 6, 2009

Baby Lemons!

My indoor dwarf citrus have been blooming for weeks now - the Meyer Lemon in profusion and the lime sparsely. But for the first time I saw tiny little citrus emerging from the blooms. Most of the branches are very thin, so I am clipping some of the buds off to improve the chances of any of them making it to maturity. I don't know if either is established enough to successfully fruit this year, but I'll give it a go!

Tuesday, May 5, 2009

Birthday Present

My friends have bought me a large, frost-free, upright freezer for my birthday! That means I can now buy local meat in bulk and save on cost while keeping to my values. My friends rock!

Wednesday, April 22, 2009

Tiny little bugs destroy my herbs

So whatever these tiny little bugs are, they've completely ravaged my indoor herbs. I believe they came in on an "organic" mint plant I brought back from the grocery store. That mint paid the price for its betrayal, along with my sage, thyme, and basil. Only survivors thus far are my citrus trees and rosemary, and even they aren't certain. Dad gave the rosemary a haircut almost to the roots, and I'm spraying soap on the citrus trees every day. The little bugs come out of the soil and I zap them. I'll give it another week, and then I'll have to try something more drastic. Those trees are too expensive to just toss, like I've done with my herbs.

It's all so sad - they were glorious two weeks ago.

In other news, my dad planted/transplanted all my failed bulbs. Who knows, if I water every day, maybe a few will come up.

Friday, April 17, 2009

Vermicomposting

Almost anyone giving advice on starting an urban homestead, or even just a more sustainable lifestyle, will advise that composting is the way to start. Composting is a great way to reduce waste, get free soil amendments for any gardening project, and conduct on-site recycling.

Because I started my first urban homesteading research during the winter, an outdoor compost pile was not feasible, but I wanted to get started immediately. Worm composting was my solution.

Worm composting (vermicomposting) consists of feeding a specific kind of worm (red wriggler) organic material which they, with the help of bacteria, convert into worm castings (poop). To vermicompost, you need a worm container, a way to moderate the temperature, bedding material, worms, and organic material.

1) The container: There are many commercial worm-composting systems available, but all are expensive. I had some plastic bins that would fit under my sink from my move, so I used a method described in the book Urban Homesteading to construct my own bins with no additional purchases. I simply drilled holes into the bottoms of two containers of the same size and into one of their lids. The undrilled lid serves as a tray to catch any liquid dripping out of the holes. The drilled lid goes on top of the composter as a cover. Right now, I'm only using one of the actual bins. When it fills up, I'll stack another bin right on the surface of the soil of the first container and start feeding only the top container. The worms will migrate through the holes in the bottom of the container over a period of a few weeks. Then the top container will become the bottom container, and I'll carry off the other container of castings for use in my garden. The two containers alternate in this way.

I should note that the book orginally recommended drilling LOTS of holes, not just in the bottoms and lids. I did this (it took a long time) and then had to cover all the holes over a period of weeks when it became apparent that Colorado is way too dry for a worm composter with that many holes.

2) Temperature control: I keep my worm composter under my kitchen sink, so temperature is not a problem. Also, I enjoy people's reactions when they hear I keep worms under my sink. Outdoor bins MUST be protected part of the year in Colorado or the worms will freeze and die. The sink limits the size of my bin - it is too small for the amount of food waste I have since I cook a lot. For me the convencience is worth it. When I get my outdoor composting set up, that's where the rest of my scraps will go.

3) Bedding material: I just use shedded newspaper, soaked in water and then wrung out again. There are other options, but this is simple and I get the Sunday paper anyway. The worms need moist bedding, and I use it to bury piles of scraps for the worms. I also keep a sheet of moist newspaper on the top of the compost to keep the whole thing moist.

4) Worms: Red wrigglers are the best worms for vermicomposting because they can deal with the scraps more quickly than other breeds. I originally ordered 100 worms but they didn't seem to be eating anything. I read the wonderful book "Worms Eat My Garbage" and discovered that, for the size of bin and amount of scraps I would be putting in the bin, I needed 1000 worms. I ordered more worms from California. Since then I've discovered a man who sells these worms in Pueblo (Colorado Earth Worms - coloradoearthworms.com). I'll go for the more local solution the next time I need worms.

5) Organic Material: Worms can "eat" pretty much all plant material and plate scrapings, but most sources don't recommend putting meat in a worm bin. Too much acidic food (citrus peals, vinegar) can cause the worms to try to abandon the bin (yipes!). Also, worms can go weeks without being fed, if there's still things left from them buried in the bin. I keep an uncovered (to avoid smells) scrap bowl on my counter, and when I have a good amount of scraps, I bury it in my bin. I bury in a zigzag pattern until all the available surface is used up, and then I add bedding and start over again. The earliest burying spots should have been turned into castings by then. You have to be careful not to bury too much at once or the worms won't be able to eat it fast enough and it will rot and smell.

Worm castings are excellent fertilizer as-is, and a worm tea can be made of of the castings for liquid fertilizer. So far, my bin has been pretty easy going. I highly recommend reading "Worms Eat My Garbage" if you want to start your own worm bin. I got a copy at the local library. It's easy reading and very informative.

Where is Spring?


Another Looooong snowstorm is in progress. I'm really glad I listened to the lady at Hillside and didn't even think about planting roses until May.

In sadder news, my herbs, which were gloriously healthy a week ago, up and 75% died. I think I have spide mites, and I don't know if they killed the herbs or if spraying them with dilluted dishwashing soap did it, but I'm totally bummed. I don't think my experiment with this (below) was very successful. At least the citrus seems unaffected.

My sister loves my Larga Vista raw milk.
On left, my herbs in happier times.

Wednesday, April 15, 2009

Worm Update

2 weeks ago I realized I had over-fed my worms in my worm composting bin, because there was some mold. So I left it alone and checked it today - looks great! LOTS of worm dropping and most of the food is gone. I added another layer of newspaper bedding and will add some more food. Soon I'll start a second bin and transfer the worms to it. But now I can make worm tea for my spring plantings!

Tuesday, April 14, 2009

Using soap to kill insects

My poor indoor sage is covered in spider mites. Once again, my locavore yahoogroup comes through with information about using soap to get rid of them, like my Dad suggested. Here is a great article on it:
http://www.ext.colostate.edu/pubs/insect/05547.html

Hopefully I'll be able to try it tonight.

Friday, April 10, 2009

Dad's Home Improvement


My 68-year-old father is a landscaping, home improvement machine! He's fixed every door in my 95-year-old house. I got a new storm door as my early birthday present. He also put in a motion light on the front of the house and fixed an outdoor power receptacle that did not have a cover on it.

But the BIG work is the retaining wall. Like many houses in the older parts of Colorado towns, mine is elevated above the sidewalk/street level. Which means I spend much of the spring and summer shoveling my yard back into my yard. Dad has torn out the makeshift retaining wall along the front of the house and put in a beautiful wall made of bricks designed for retaining walls. He's also shoveling the raised soil from my hellstrip to fill the gap made by the removal of the old retaining wall's 10x10's. This soil is rich from years of rotting leaves and will make a great place to plant climbing plants along the chain link fence that surrounds three sides of my house. Maybe it could even support the Concord grapes recommended for this area? The hell strip will be HEAVILY mulched using wood chips I got from AAA tree service for $75/truck load. Either way, the appearance of my front yard is hugely improved, and the long term maintenance just got much simpler.

I love my dad!

Friday, April 3, 2009

My parents come to visit

Dad was up at 4am staring out the window wanting to get to work! He's fixing a lot of little things around the house and helping me with my landscaping. I have a feeling we're going to disagree on the vegetable garden, but almost everything else we agree on.

I also finally got a downy ball to put vinegar in my rinse cycle. Small steps!

My latest batch of bread dough failed - way too wet. It gets wetter as it sits, so I think I have to keep that in mind when I'm mixing it. I'll use the remnants for pita (which doesn't care as much) and then start a new batch.

Dani on my yahoogroup explained her reasons for using Lasater's family pack of beef, and so far this is sounding like my best option for local, grassfed, sortorganic beef. I think $5/pound is pretty reasonable for that, and it's definitely cheaper than individual cuts from Larga Vista...but what about buying half a cow? Still have to do the math.

Friday, March 27, 2009

Blizzard

The first real winter weather of the winter season hits in late March, go figure. Anyway, outdoor projects are on hold and I'm officially behind on preparing for my parents' visit.

Monday, March 23, 2009

Yogurt, Improved

I figured out why I was getting so much whey in my yogurt. I assumed that all I needed to do was scald the milk to kill competing bacteria, but in fact the milk must be heated to 180 degrees in order to change the structure of the milk protein. I did that this weekend and got a much creamier, whey-free yogurt. Success!

I'm draining another batch of yogurt in an attempt to make labneh, a kind of middle-eastern cream cheese. It's the second item in Fankahuser's series of cheese-making tasks for beginners. We'll see how it turns out tonight.

I'm so far behind on my yard and vegetable garden. I need to stop planning and start doing!

My indoor citrus trees are really taking off! Both have sprouted lots of new leaves and look very healthy. The lemon tree has a rouge branch that I am contemplating pruning, but I don't know anything about pruning so I just keep staring at it and wondering what I should do.

Tuesday, March 17, 2009

Composting Supplies

In the interest of finally starting a real compost bin (and getting rid of the piles of stuff all over my yard) I bought three cheapo garbage cans with lids and some bungee cords yesterday. The bungee cords are to hold the lids on from critters and for when I roll the barrells to mix the compost. I will punch holes in the can with a nail. For now, I have a lot of "brown" material, which I will put in the bins temporarily and shovel in bits into the bin where I will add green material as needed. I hope that with three bins I will be able to let one bin sit and do it's thing while I'm mucking about with the other two.

BTW, raw, whole, milk tastes so good!

Monday, March 16, 2009

Homestead weekend


Now that I have my Larga Vista Ranch milk, I made yogurt again this weekend. This time I did not skim the cream off first, hoping for a creamier yogurt, but the yogurt had a lot of whey around it. I'm not sure why it turned out so differently from the last time I made it. I made a second batch on Sunday to use in making Labneh, a middle eastern cream cheese. Fankhauser's cheesemaking site (link on right) recommends a progression of cheesemaking task for newbies, and Labneh is second on the list after yogurt. It seems to have a lot of whey too.


I also finished off a batch of 5-minute bread dough making pita and a boule. I was surprised both worked because the dough had gotten really wet and seemed flat, but the boule turned out perfect. However, one of the pitas stuck, which resulted in some serious scraping of the baking stone.


All the herbs and the citrus trees I potted are taking off. I have to rotate them every day because they're really stretching for the sunshine from that southern window. It finally occurred to me that I ought to pull the sheers back. I may like my sunshine filtered through them, but the plants are liking the more direct light.

My sweetie also took me shopping for the non-lumber portions of the gear I need to make my self-watering raised beds. I now own my first circular saw. Now to find a lumber yard...

Friday, March 13, 2009

Green Cleaning for Cheapos and the Lazy

I've been ripped off most of my life by the companies that make cleaning products. One thing I have been discovering this last year - I need almost nothing they sell in the cleaning aisles. It's all marketing and germ-phobia. For the record, I don't believe in killing every germ in the house. I think it makes us sicker in the long run.

I've been cleaning almost all the surfaces in my home with a spray bottle filled with a 50/50 mix of vinegar and water for a year now, including my sealed hardwood floors. It is not any harder than cleaning with Windex/409/Lysol/etc, and my house is just as clean. The vinegar smell lasts only for a moment, and then all you smell is clean because vinegar is a natural deodorizer. No perfumes, no mystery chemical, no need to put child locks on the cabinet under my sink. To clean my floors, I spray them and then wipe them down with a rag attached to a Swifter after sweeping. My floor shine.

For the kitchen I sometimes need a little more oomph, so I have another spray bottle with a 50/50 mix of vinegar and water and a tablespoon of unscented liquid castille soap. Castille soap is made of vegetable oil, so it cuts grease very nicely. It will not, however, dissove in vinegar and water, so I shake the bottle a couple times before every use. Seeing globs of the soap in the bottle is normal. The other difference between this and the plain vinegar bottle is that, because of the soap, you need to rinse.

I scrub sinks and my tub with baking powder when the vinegar doesn't cut it.

For my wood furniture, I dust with a microfiber clothe. I polish occassionally with my one BELOVED commericial cleaning product: Howard's Naturals wood cleaner. Read the label and you will recognize all the ingredients - no mystery chemicals here. Wood positively loves this stuff. I had a hope chest that was badly water damaged, and after using this on it for a couple of months, the damage is now invisible. This stuff is pricey and totally worth it.

My other commercial cleaning product is 7th Generation dishwashing powder. I use it for environmental reasons. It works fine, and as far as I can tell there are no homemade or natural alteratives for the dishwasher. Bummer. I get 7th Gen cheaper through Subscribe-and-Save on Amazon.

I recently started making homemade laundry soap. It is much cheaper and so far it seems to work better than commericial detergeant. I read that this is because the companies that make detergeants are too cheap to put actual soap in them. They use detergeant made from petrolium, which is cheaper and doesn't clean as well. But I can't verify that.

I make a very easy powdered version, but I'm thinking of making a liquid one for the darks/cold cycle. To deal with any potential residue in my pipes and to soften my clothes, I use a Downy ball full of vinegar. BTW, it also helps deodorize clothes too.

CAUTION: Vinegar does not react well with bleach. Combining the two will release a toxic gas. Don't use the two in the same cycle. Also, I tend not to use bleach. I stick with oxygen bleach.

Making powder homemade laundry soap takes three cheap ingredients, a grater, and a food processor. It took less than 20 minutes. I found all the ingredients at King Soopers. To learn about the details, see the Homemade Laundry Detergent link under Tips, Instructions, Resources on the left side of this page.

I still have unsolved green cleaning dilemmas. I've heard my homemade laundry soap will also clean a toilet, but I haven't tried it yet. Also, what about liquid dishwashing soap for handwashing dishes?

From what I can tell, vinegar in the rinse cycle will soften clothes but will not prevent static cling. There are recipes for homemade fabric softener, but I don't see a green benefit to them. I think the best option is finding ways to make my own reusable dryer strips and reduce the amount of softener used. This will be one of my next green cleaning projects.

All in all, I enjoy not breathing in or touching scary chemicals, paying a lot less for my cleaning products, and having a house that smells clean rather than perfumed. Sorry, I totally don't understand air fresheners. They make me feel sick, and I wonder what stink they're covering up when I encounter them in other people's homes.

Thursday, March 12, 2009

Raw Milk and Homemade Dairy

finally got off the waiting list and into the regular rotation for Larga Vista's raw milk!

FYI, buying and/or selling raw milk is illegal in Colorado. It is, however, legal to drink raw milk from your own cow. So I bought a share of Larga Vista for $40 and now I own a piece of all those cows! In order to get milk, I pay for the feed and boarding of my cows. I pick up the milk at a park near my home after work on Tuesdays.

Raw milk is both unhomogenized and unpasturized. All homogenization does is break up the fat molecules in milk so that the cream won't separate to the top and people don't have to shake their milk before they pour it. No one knows what this does to people who drink milk. It does nothing to make milk safer. And I find it really annoying since I WANT to be able to skim the cream off the top. Especially since Larga Vista milk has LOTS of cream in it.

Unpasturized milk from most modern dairies is extremely dangerous and will make you sick, because the cows are raised under horrendous conditions. Larga Vista insists you visit the ranch before they will sell you a share, and their dairy practices are impeccable. Their website www.largavistaranch.com goes into their farming practices. No one does milk better than them in Colorado.

I also pick up a dozen pastured eggs from the same people as part of an "egg share" program where I bought 3 months worth of eggs at once. In this case, the egg share program let Doug and Kim (the Larga Vista farmers) buy enough chickens to replenish their flock (which had been decimated by a fox) and guarantees them sales. On the customer end, I get local, free-range, pastured eggs from chickens raised the way everyone imagines chickens are raised (but almost never are). And the price is comparable to organic eggs in the grocery store.

I brought the eggs home and cracked two of them along with my last grocery store (organic!) egg into a bowl to make myself an omlett. The difference in the yolks was amazing! Even the Whole Foods organic yellow, while the Larga Vista egg was deep orange. Yummy!

As for the milk, when I was on the waiting list, I was able to get a few jars here and there and successfully made yogurt and butter, as well as enjoying the milk plain.

I use a yogurt maker to make yogurt, though there are many techniques for maintaining the temperature that do not require one. It's just simpler for me. I use a freeze-dried yogurt culture. Making yogurt basically involves:
1) Heating the milk to a specific temperature
2) Cooling it back down to a lower specific temperature and stirring in the culture
3) Maintaining the temperature (that's all a yogurt maker does) and waiting for the culture to do it's job. This takes between 4-8 hours depending how tart and firm you like your yogurt.
4) Refrigerating the yogurt
I do not add any dried milk or other thickeners to my yogurt as I want it as pure as I can get it. When I want fruit flavor, I put a small spoon of preservers or jam into the serving I am eating. I don't flavor the whole batch because I enjoy plain yogurt and I also use it as a replacement for sour cream. Honey is also excellent for sweetening yogurt. If any liquid forms on the top of your yogurt, don't stir it in; just drain it off.

There are many good resources out there for making yogurt. It's easy and much better than what you buy in the store. I used the technique described in the book "Urban Homesteading," but most of the methods out there basically describe the same process. Making your own also saves money and reduces waste (all those little plastic cups). I highly recommend it. Now that I have a regular source of good milk again, I'm going to be making all my own yogurt. BTW, this can be done with grocery store milk, if you like.

Making butter is even easier than making yogurt. You CANNOT make it with homogenized whole milk because there is no cream to skim, so if you are getting your milk from the grocery story, you need to buy cream. This pretty much eliminates the cost savings, though you will get a higher quality butter by making your own.

Basically all you need to do is agitate the cream for about 8 minutes until you see the butter separate out. This can be done with a jar, a marble, and a hyperactive child. As I lack a hyperactive child, I use a blender. Once you see the yellow globs form, you drain out the liquid. This liquid is REAL buttermilk and can be used in baking or you can drink it. Then you wash the butter. I put the globs in a small bowl and repeatedly add water, press the butter with the back of a spoon, then drain off the cloudy water. I do this until the water is clear. You're basically washing remnants of the milk out, which will make the butter keep longer. Then refrigerate.

Because homemade butter does not have water or other ingredients whipped in like storebought butter, it will be much harder in the refrigerator than your regular stick of butter. I've heard a butter bell is a great solution to this, and it's on my list of things to buy.

I have READ that all it takes to make cream cheese is to drain yogurt for several hours. This is next on my list of homemade dairy projects to try. Last year my sister and I read how easy it was to make mozarella, but we screwed it up and ended up with farmer's cheese. Hopefully the cream cheese experiment will go better than the mozarella experiment! Now that I understand controlling the temperature of milk better, I am ready to try mozarella, and making Ricotta, again.

Once I am done with these dairy experiments (and I'm confident that I'll eventually get mozarella right) I will be able to produce ALMOST all of my dairy needs in my kitchen with organic milk from local, healthy cows. To me, this is a locavore and urban homesteading ideal. Hard cheeses are the exception, but one day I will tackle them too! So I've made good progress on dairy, and I have a plan to attack my meat, fruit, and vegetable needs. And a vague idea about flour and baked goods. If I can get all but my oils and a few luxeries, I'll be "importing" only the kinds of things people used to before refrigerated trucks ruined food in America: coffee, tea, sugar, some spices. For me, this kind of independence from an untrustworthy and unstable system that feeds us poisoned, low-quality food is worth the work.

And, like the authors of Urban Homesteading stated, there's always more power in being a producer than a consumer.

Wednesday, March 11, 2009

Indoor Herb Garden and Citrus

This weekend I went grocery shopping and they had a random cart of organic herb plants for sale, so I got a peppermint, sage, and thyme and potted them up in the few pots I already owned. I still have a flourishing rosemary I bought from the local nursery down the street.

I started a basil plant from a cutting by removing the bottom leaves and letting the cutting sit in a glass of water. It took over 2 weeks, but roots did miraculously appear! I potted this one up too and it's doing great.

So the herb garden is officially started. All my pots are sitting in front of my largest south-facing window.

I've grown herbs successfully before. For beginners, the easiet way to kill herbs is to over-water them. Let the soil get completely dry between waterings, use soil that drains well, and ONLY use a pot with a drainage hole in the bottom. Many of mine did not have one, since I improvise with all kinds of cheap containers I buy at Goodwill. I found it was easy to add a hole with a drill.

Of all my urban homesteading projects, this is the only one I have significant past experience on which to rely. My other recent indoor gardening project: indoor citrus. About which I know only what I read. But there's no such thing as local citrus in Colorado, so I'm going to give it a shot.

I purchased a 2-3 yr. Bearss seedless lime (aka Tahiti/Persian) and an improved Meyer lemon from Four Winds Growers http://www.fourwindsgrowers.com/). They arrived in excellent condition and were both thriving despite the fact that they shipped early, arrived when I was away on businesss, and sat in a dark shipping box for 4 days before I could get to them!

Both are grafted dwarfts and popular choices for growing citrus indoors. "Sour" citrus (as opposed to sweet citrus like oranges) is supposed to be relatively easy to grow indoors in a Northern climate. I'm a little worried about the low humidity and plan to mist the plants when I water them. I hope it won't require an acutal humidifier or grow light. Since I'm operating without any experience, only time will tell!